


Table Of Contents
This book is from 2005 and with 420 pages it is a “normal” sized tech book. The purpose of the book is to describe how we can add features, fix bugs and refactor in legacy code bases with as much confidence as possible. The primary takeaway is to add tests to aid us when making changes.
The book does show some age in a few places where there have emerged tools to support us. But all in all the book contains good pointers on how to approach legacy code. Much of the advice borders to common sense, but I still think it is a good idea to have the concepts in mind because it is easy to forget and just edit and pray.
The first part of the book(first 5 chapters) sets the stage for how we should think about working with changing a legacy code base. It shows some age, anyone who has worked with test-driven development or unit testing is well aware of many of the points. But it serves perfectly as a refresher and reminder.
Chapter 1, Changing Software
There are 4 primary reasons to change software.
- Adding features
- Fixing bugs
- Improving the design
- Performance optimizations
The part of any software that adds value is its behavior. When we fix bugs or add features, we change the behavior of the software. But if we break existing behavior or add buggy behaviors, our users stop trusting us.
When refactoring software to improving the design or performance, it is easy to add bugs or remove behaviors. Because much legacy code does not have test coverage, we are not able to verify if we change behavior. It causes much refactoring not to happen because of fear of breaking the system.
Making changes is risky. We need to preserve the behavior of a large part of the system while only modifying a small part of it. The risk surfaces because we usually do not know how much of the existing behavior is at risk. Usually, the risk is handled very conservatively. For example, adding a small code change inside an existing function to avoid making to many changes. But this practice catches up to us because many small changes make classes larger and more unreadable.
Chapter 2, Working with Feedback
Changes in software happen in two ways, either using Edit and Pray or Cover and Modify. Industry standard is more or less Edit and Pray making changes risky. But changing our practise to use Cover and Edit makes changes less likely to break existing behavior.
First create a test harness around the code you are going to change using unit tests. When the tests are covering the code we can start making changes, if we break anything, the tests should notify us almost instantly making changes safer.
But there is a dilemma to this practice, we often need to change the code to be able to put tests into place. There are some practices to help us put the tests into place in a safe way which are presented in later chapters. We do not want to introduce errors while adding tests.
Chapter 3, Sensing and Separation
To get tests into place we have two reasons to break dependencies: sensing and separation. If a value that the code computes needs to be known to the test, we need to make it possible for the test to sense the value. If the code depends on something that makes it impossible to set up a test harness we need to separate the code from that dependency.
The primary tool for sensing are fake collaborators. It allows us to inject a fake version of an object that gives us the option to fetch the values from any call to it. It is often implemented using mocks.
If two responsibilities are combined into a single class, for example registering a sale and communicating to a hardware cash-register display to show the text. Then we are not able to make a test harness without separating talking to the hardware and the sales logic. So they need to be split.
Chapter 4, The Seam Model
If the code is not written with testability in mind it is poorly suited for testing. To get started creating a test harness we need seams, that is places where we can alter the behavior of the system from the “outside”.
There are multiple types of seams, but for OOP the Object Seams are the most interesting. An object seam is a method call on an object which we can change from the test. It is easy if the dependency is injected in a constructor and defined as an interface. Then we can easily make a Mock to stand in place of the object allowing us to use the seam.
Chapter 5, Tools
A list and discussion of tools like JUnit, shows a lot of age.
Chapter 6, I Don’t Have Much Time and I Have to Change It
Doing it right takes more time, and the benefit is not instantly visible. Why improve code where next change might be years down the road? There are a few reasons.
When there are tests around the code, it is often easier to make sure the functional changes works as expected. In the short term it makes it easier to make changes without introducing errors.
In the longer run, changes tend to cluster around the same code, so code that is changed today probably means that code close by needs to be changed soon. When revisiting code in this way the improvements cascade and make our lives easier.
We must resist the presure to do the change in-place and “add the tests tomorrow”.
The first shortcut to make the changes faster is to use a sprout or a wrap. But this approach should not be our first choice if possible, because it does not improve the situation. Sprouts come in different versions, Sprout Method and Sprout Class. Same with wraps, they also exist in two versions Wrap Method and Wrap Class.
Sprout Method: If we need to add a new feature to our system and it can be formulated as new code, then we can use a sprout method. The new method can then be called from the place where it is needed and the new method can be completely under test.
The example in the chapter is an existing method that adds a list of entries to a transaction bundle. The new functionality is to avoid duplicates. It can easily be added if we change the code inside the loop. But it causes the loop to have two responsibilities, and we are not able to test the new functionality isolated.
Instead we can introduce a sprout method that filters the list for duplicates, this method can be called before the loop and it can be tested separately.
We should use sprout method when we are not able to get the original method under test. It is far superior to adding code inline.
The problem with this method is that it is essentially giving up on on the existing code for the moment. The advantage is that the new code is clearly separated.
Sprout Class: it is the next step up, if the code resides in a class that is impossible to instantiate we can not get a sprout method under test. In that case we can add a new class to contain the new functionality.
It will often generate a class for a little functionality, it might seem overkill at the time it is introduced, but after a few months it might have been the right decision. The main problem with it is the conceptual complexity it adds to have another class.
A different approach is to add wrap method or wrap classes. With sprout the new code is called from the original code. But that is often not as clean as we want. Insteap we can wrap the existing code with new functionality.
Let us say we have a method called pay() that calculates and execute payments. We want to introduce logging. Then we can move the code in pay() to calculateAndExecutePay() and make the pay() method call the new function + the other function we have created to log. The downside is that it needs to be a feature that can be added either before or after the existing feature. Another downside is that we move a concept to a new place with a new name, and it can be difficult to get the new naming correct.
The concept with wrap class is the same, in this case we apply the decorator pattern to wrap the existing class but keep the same interface.
Working this way might seem like more work and diluting the concepts in the existing code. But, as the author notes: When people do this in projects, you start to see new classes and methods sprouting around the carcasses of the big old classes. Then an interesting thing happens. After a while, people get tired of side-stepping the old carcasses, and they start to get them under test.
Chapter 7, It Takes Forever to Make a Change
Depending on the code base, the same change can either be easy or very difficult to implement. The author highlights three different areas that contribute to making changes take a long time to do. Understanding, Lag Time and Breaking Dependencies.
Understanding: When the code base grows it naturally becomes harder to understand. The key difference between a legacy system and a well-maintained system. It may take a while to understand how to make a change in a well-maintained system, but once you understand it, the change is usually easy, and it is comfortable to change it. In a legacy system, both operations are difficult.
To make it easier we should strive for a system that is broken up into smal, well-named and understanable pieces.
Lag time: It is the time it takes from the change is made and real feedback is available. If we have a good test harness that allows us to run tests in less than 10 seconds, it allows us to concentrate better, and we can correct errors on the fly. Worst case we do not get feedback before the change is in production.
Break Dependencies: The primary way we improve lag time and understanding is to break dependencies. If we have a class in a test-harness we can take advantage of very fast edit-compile-link-test times.
But if our code is structured in a way that makes the compiler recompile everything after each test, the roundtrip time is going to be slow. To avoid it we apply the dependency inversion principle from SOLID. It introduces a small extra mental overhead because the number of interfaces increase. But, it is well worth it.
Chapter 8, How Do I Add A Feature?
If we are not careful it is easy to fall back on the techniques from chapter 6 and hide from the problem. The hazard is that we do not improve the existing code using that approach. Another potential problem is duplication.
In general, it’s better to confront the beast than hide from it.
When we get a test harness into place we gain a solid foundation to build from. We should practice TDD which for legacy code boils down to the following 6 points
- Get the class you want to change under test
- Write a failing test case
- Get it to compile
- Make it pass (try not to change existing code as you do this)
- Remove duplication
- Repeat
Step 5 is very important, if we leave duplications in place it causes a larger future maintenance burden.
In OOP there is an option to add features by inheritance, programming by difference. It other problems, but we can use it as an intermediate step.
By extending an existing class we can override behavior without touching the existing code. The problem is that we can not easily compose the behaviors when we use inheritance. But, it allows us to add tests that pass easily. So we can refactor to another design while making sure that the behavior is preserved.
The example in the chapter progresses as: Initial functionality is implemented as a subclass. The behavior is then rolled into the parent class and triggered with a constructor argument. The constructor argument is then moved to a generic configuration class which has a list of key/values. The behavior is moved to another class that is passed as a dependency. Lastly, the new class is renamed into a new domain object. It shows how we can progress the programming by difference concept.
We must be aware of the Liskov substitution principle, if we are not careful with new classes being substitutable, we can introduce subtle errors. A few tips for preserving LSP: Avoid overriding concrete methods. If we must override a concrete method call the parent method if possible.
Chapter 9, I Can’t Get This Class into a Test Harness
As the author writes: “This is the hard one.” There are four common reasons to why it is difficult to instantiate a class in a test harness.
- Objects of the class can’t be created easily
- The test harness won’t easily build with the class in it
- The constructor we need to use has bad side effects
- Significant work happens in the constructor, and we need to sense it
We might have a parameter in the constructor that is not easily instantiated. The first step is just to try it out in an empty test a “construction test”. This allows the compiler/ide to help us figure out which parameters we need to construct.
One example is a database connection; it is often not a good idea to create one and pass it into our test. It is slow and difficult to manage. The first thing to try is to create a fake connection so we can control it. A fake for such a class is not that pretty. It returns null for many methods because the class does not need them under test. It is bad practice for production code, but for test code, it is ok, because it makes testing possible.
Test Code vs. Production Code: Test code do not need to be of the same standard as production code. However, it must be clean and easy to understand.
A trick for parameters that are difficult to create is to just pass null instead. If the object is not used by the code we excercise in our test harness we need not bother.
Hidden dependencies: In some cases a class creates new objects in its constuctor. In this case we can not easily overwrite the behavior for our tests. It might be that the dependency has a side effect like sending emails that we want to avoid in our test harness.
A way to move on from this situation is to use a parameterized constructor. Here we move the dependency to a parameter in the constructor. Since most languages support overloaded constructors we can keep the old constructor in place and allow a new constructor, only used from tests to replace the dependency.
Construction blob: If a constructor creates many objects in its constructor it might not be feasible to make them all parameters. In this case we can add setter methods that allows us to override the instance variables when the object has been constructed. But we must be caseful not to use them in our production code.
Global dependency: Global variables are bad for multiple reasons, one is opacity. It is difficult to asses the side effects of code that uses global variables because any method call might change any part of the system.
If the global variable is implemented using a singleton, we can break the dependency in a way that allows us to inject our own instance into the singleton by introducing a new method in the singleton class.
Singletons exist for multiple reasons but not all of them are valid reasons for such a prohibitive design. In many cases it is all about convenience, we might need a repository, and instead of passing it around the system it is implemented as a singleton.
A singleton could have merit if we need a single point of access to a hardware device. It would be dangerous if two parts of the software operate control rods in a nuclear powerplant through two different instances.
The easy way to break the dependency on a singleton is to make the constructor public and inject it as a parameter in the constructor of our class. That allows us to use the singleton directly. If the singleton has side effects that we do not want we can subclass and override methods.
Onion parameter: Sometimes we have objects that are difficult to construct because they need other objects that in turn need yet other objects all down the rabbit hole. We can break the dependencies by introducing interfaces instead of actual implementations, that allows us to not continue down the rabbit hole of dependencies.
Chapter 10, I Can’t Run This Method in a Test Harness
When we have instantiated our class the next step is to write tests for the methods we need to change. It can lead to the next round of problems. The method might be private, the parameters might be hard to create, the method might have bad side effects, or we might need to sense through objects the method uses.
The method is hidden: A private method is not callable from a test, so we need another way to test it. Maybe we can call it indirectly through a public method on the object. If not we should make it public. If making it public bothers us, the class is most likely doing t0o much, and we should fix that.
But if the method is a utility method that clients should not care about or if calling the method directly could mess with the object, we might not want to make it public. In the first case, we should make it public. It is not such a big issue. In the second case, we can move the method to a new class where it can be public.
We should avoid using reflection to “cheat” the code to allowing us access to calling the private method. It will just delay the bill of technical debt to be payed.
“Helpful” language features: Some classes are impossible to extend because they use the final/sealed keywords from Java/C#. If the class also have a private constructor we are out of luck.
If we are luck there might be a superclass that we can extend instead. It will mean that we need to change the code to use the superclass instead.
We could also create a wrapper around the class, create an interface for it and make a fake and production implementation. Again it requires us to modify the code before we can get it under test.
Undetectable Side Effects: Objects use other objects, in many cases we call a method, the method manipulates other objects and we know nothing about it. But to test properly we need a way to sense what is going on.
The example from the chapter is about a GUI where several responsibilities are combined into the same class makes it impossible to sense what is going on. It is split up into multiple classes to allow us to sense the interactions between the classes. Most of the changes to get to this structure can be made with refactoring tools to make the changes safe so we can add tests. So afterward we can add our changes.
Chapter 11, I Need to Make a Change, What Methods Should I Test?
Before we make a change we should make sure we have the behavior of the code under test. To do that we write characterization tests to pin down the behavior that is already there.
The difficulty is that a change in one place can affect behavior somewhere else in the code. This chapter covers how to make sure we know about all the places in the code a change can affect.
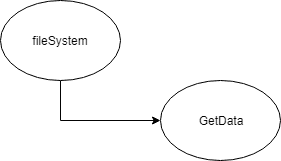
As part of any change a programmer does, he reasons about the program, that is not new. A way to reason in a structured way is to use effect sketches.
We make a diagram with a bubble for each variable and return value that can change. Then we draw arrows between the bubbles from where it can change. The diagram helps us figure out where to test.
Eventhough the book is more than a decade old there does not seem to be much material on effect sketches. I can see some value of using them to have a more structured way to reason about software effects, but the idea has not caught on it seems.
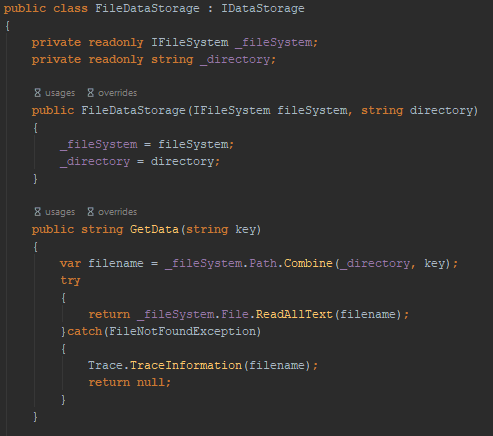
In this example, what might change after a FileDataStorage object has been created that can affect what GetData() returns.
If the fileSystem variable is changed by the calling code GetData() can be affected. An effect sketch could look like this.
When writing characterization tests we can use the effect sketches in reverse to see where we can add a test. We ask our self, what will change downstream if this method stops working.
We should add tests where it can sense the effects of changing the code.
When we do a change the effect of the change can propagate to the rest of the system in three ways. Return values, modification of reference types passed into the class, or static/global data.
Getting an overview using effect analysis can be difficult in an unknown codebase. As you get more familiar with the code “rules” should pop up. If you see that global variables are never used it counts as a “rule” in the codebase and you can get away with not looking for this type of effect.
Removing small pieces of duplication, the effect sketches usually becomes smaller. It makes more internal dependencies in the class and allows us to make characterization tests on a smaller interface.
Chapter 12: I Need to Make Many Changes in One Area. Do I Have to Break Dependencies for All the Classes Involved?
When we need to modify a handful of closely related classes to implement a feature, what do we do about test? We chould put each class in a testharness but we could also take a shortcut.
If we can test all the related classes indirectly using a class or method that calls every method that we need to change, then we could get away with only testing that.
A kind of integration test and further it allows us to change all the code below radically without affecting behavior. The author notes that this kind of tests should only be an intermediate between getting it all under unit test. The points that allow us to test in this way is called a pinch point.
If we draw effect sketches for the code that is affected by our changes we can use the sketches to find places where we can assert on our change. These places are called inception points. It is a good idea to select inception points that are close to the change points.
We can use the effect sketches to find more high level points where we can test more of the functionality using a single entry points instead of bothering with putting each individual class under test.
Chapter 13: I Need to Make a Change, but I Don’t Know What Tests to Write
The author notes: “The way to win is to concentrate effort on not putting bugs into code in the first place”. We use automated tests to achieve that, tests that specifies becomes tests that preserve behavior.
When working with legacy systems what the system does is more important than what it is supposed to do. We start with writing characterization tests. The way to do it is to write a test that we know fails and when it fails, we copy the result into the test. It feels a bit like cheating, but it makes sure that the test characterize the behavior of the system.
We should keep writing tests until we are satisfied that we understand the behavior of the part of the system we are testing.
The idea of a characterization test can be extended to characterizing a class. The tests become the documentation of the actual behavior. We should take extra care to document behavior at extreme values, anything we can imagine could go wrong and document invariants.
What if we find bugs? When peaking into legacy code, we will almost certainly find bugs. We should make sure that nobody depends on the behavior we are changing before we do any changes.
Chapter 14: Dependencies on Libraries Are Killing Me
Do not do it! Avoid depending directly on libraries at all cost. Wrap them and provide your own interface to the library. It allows you to change the library in the future.
Chapter 15: My Application Is All API Calls
There are two ways to go on from this situation, Skin and Wrap the API or Responsibility-Based Extraction.
When we skin and wrap the API we create interfaces that mirror the API with thin wrapper implementations that passes data on to the API. It allows us to make fake implementations for the tests.
If the API is more complicated we can use Responsibility-Based Extraction, here we extract the few methods we need and implement only those. It gives us a more high-level API. Many teams combine the two methods so they achieve both a firewall from any API dependency and can supply the application with a high-level interfaces.
Chapter 16: I Don’t Understand the Code Well Enough to Change It
The edit and pray method of introducing new features is not a happy place to be. Instead, we can gain confidence in a more structured way. Using notes and simple sketches on paper we can gain a better understanding.
While we work through the code we note down an simple diagram of how we understand the code. It also allows us to have a conversation with a college more easily.
Another method is to print the source code and use it to reason about the behavior. It is especially useful when working on larger methods. We can use special symbols to mark related responsibilities so that we can group them. We can also combine with effect sketches to get an overview of how changes affect other parts of the code.
One of the better ways to reason about the code is just to refactor it. Move things around to gain a better understanding. We need to throw it away afterward because we are doing the changes without a test harness.
Lastly any unused code should be deleted to make the rest of the system more clear.
Chapter 17: My Application Has No Structure
If an application has grown large over time without attention to structure it tends to sprawl. The application might be so large that it is difficult to gain an overview. It causes “hack points” to be introduced. When a new change needs to be added the developers go back to the hack points because that is the part of the code they understand best.
To help a team keep a good structure an architect is often appointed. Unless the architect has time to be part of the team and look at the code on a day to day basis, the understanding of the code diverges.
The author introduces three tools to help the team keep a shared understanding of the architecture. “Telling the Story of the System”, “Naked CRC” and “Conversational Scrutiny”.
Telling the Story start by one person asking “What is the architecture of the system?” Another person answers by articulating the most essential things about the system.
Since the actual implementation is riddled with details the simple articulations feel like small lies. That is ok since the story should serve as a roadmap. When we need to introduce a new concept, and we have multiple ways of doing it we should take the way that makes the story feel less like a lie.
Naked CRC(Class, Responsibility and Collaborations). We start with a person with a deck of blank cards. The cards are put on a table while he describes their meaning, each card is an instantiation of a class.
Conversation Scrutiny: This concept is very similar to the DDD concept of ubiquitos language. If the language used by the team differs from the language used in the code we should align them.
Chapter 18: My Test Code Is in the Way
I do not think this chapter gives much value. In most programming languages there are conventions on how to name and where to place test code so it is better just to follow those conventions.
Chapter 19: My Project Is Not Object Oriented. How Do I Make Safe Changes?
The difficulty is that most none OOP type languages does not have the same amount of seams. Dependencies can still be broken but it requires different means like a preprocessor to do. The chapter contains a few examples on how to do it.
Chapter 20: This Class Is Too Big and I Don’t Want It to Get Any Bigger
Software gets “swampy” when we keep adding code to existing classes and methods. It leads to confusion when a class has multiple responsibilities. Another problem is with encapsulation. It is a great concept when it helps us reason more easily about our code. But, with a big class, too much can be hidden.
Refactoring is the remedy for a big class - break it down into smaller classes. To guide us we start with the Single-Responsibility Principle. We try to group the functionality in the existing class into responsibility groups, the groups could be new classes.
The chapter shows seven heuristics to find the responsibilities.
Group methods: Similar named methods are often related. We can group by the names.
Hidden methods: if a class has many private and protected methods it indicates that they should be split into their own class.
Look for Decisions That Can Change: are anything hardcoded, something that might change? If there are methods of very different abstraction level, they can be extracted, that might make groups more obvious.
Look for Internal Relationships: it might be that some instance variables are used only by a group of methods but not others. That might also provide insights.
Primary responsibility: We can try to explain the responsibility of the class in a single sentence. We can violate the Single Responsiblity Priciple in two ways, interface level and implementation level.
If a class implement a huge interface it violates SRP. But, that is often not that big a problem. A more serious problem is when it is violated on the implementation level. If the class implements a large interface but delegates, we are often ok. But, if it implements all the stuff we are in trouble.
To improve the situation we can apply the Interface Segregation Principle so we only expose part of the class to the client code. This can be the first step to move code away from our big class.
If all fails, Scratch Refactoring: Use it to understand the code, but remember not to commit it.
Focus on the current work: Maybe the current task can be made as an add on to the existing class.
To get better at identifying responsibilities, read other peoples code. Open Source projects and books.
When responsibilities are found we must apply strategy and tactics.
Strategy: we should avoid the urge to go into a refactoring spree that takes a few weeks. It always leads to unstable software that takes a while to stabelize.
Do the changes a little bit at a time to spread out the risk and the pain of unstable software.
Tactics: If we can get tests into place, extracting new classes are straight forward. If not, there is another way: the 7 point described in the chapter to extract without tests.
It is essentially just a guide for how to mecanically extract the code in a way that introduce least risk in the process.
Chapter 21, I’m Changing the Same Code All Over the Place
Sometimes systems are built without attention to duplication. This can lead to the problem where making a change requires us to change the same code all over the place.
Is it worth spending the extra time to remove the duplication? As the author explains, it depends. In the chapter we are walking through a code example with some duplication.
The first step is to remove small pieces of duplication. It make larger duplications more clear afterward. If two methods look the same, we should extract the differences to other methods because it allows us to remove one of the methods.
Sometimes we end up with classes that are just shells with almost no functionality because it is moved to a commonplace. If the classes communicate to a client, it is worth keeping them because they often make the use of the classes easier.
We should avoid using abbreviations becauce it is easy to mess it up and use different abbreviations in different places.
With duplication removed across classes, the methods are very small and focused. It gives us the advantage of orthogonality or independence. Since behavior is now only programmed in one place, to change the behavior only requires changes in this place.
t
A thing to notice is when removing duplication, a design often emerges. It is a way to distill a design to make it more flexible and faster to work with.
Having a flexible design that allows to extend code instead of modifying it leands it self to the open/close principle. Meaning that we do not need to change much code to add new features.
Chapter 22, I Need to Change a Monster Method and I Can’t Write Tests for It
We have all come across the dreaded huge method spanning hundreds or thousands of lines. We can avoid doing anything by using sprout method/class. But that does not improve the situation in the long run.
There exist a few variantion of monsters, bulleted method and snarled method.
The bulleted method is just a long list of statements with no indentations. We should be able to extract each section to its own method. But in many cases the sections are interdependent. But should be manageable if we keep extracting.
A snarled method is a method with a large amount of nested loop and conditions. It is harder to handle this type of methods.
Often a monster method is a combination of both types. We should use automated refactoring tools as much as possible. The tools allow us to refactor using tools, and we should have the discipline not to do any other refactoring as we do this as it breaks our safety net.
When the method is broken up it might not be pretty or optimal, but it introduces the seams we need to break dependencies and introduce our tests.
We can use different strategies to break up the monster methods.
Skeletonize methods: most methods have if statements, we can leave the if statement in the main method and extract the conditional logic and the body to separate methods. When this refactoring is complete the monster method only consist of the structure, everything else is delegated to other methods.
Find sequences: another way to handle the if statement above is to extract all of it into a single method. This allows us to better identify common sequences of operations. We often end up going back and forth between the two methods.
Extract to the Current Class First: Some of the extracted code sometimes belong in other classes. For example if we extract a method and call it recalculateOrder we might see that the because of the “Order” part it should be part of the Order class instead. We should use the akward names first and not move them before later when the refactoring gets further.
Chapter 23, How Do I Know That I’m Not Breaking Anything
It is easy to break code, just the smallest error can make a system unstable or not working. There are a few strategies to avoid introducing errors when we write code.
Hyperaware Editing: Either a keystroke changes the behavior of the program or it does not. Tests help us to know if a change affected the behavior or not. Same with pair programming. It introduce a flow state where we get continous feedback.
Single-Goal Editing: It is easy to get carried away when programming, one thing leads to the next, we might fix this thing over here and that thing over there. Soon the original goal gets lost in the process. We should strive to set a single goal at a time, complete that goal and continue with the next goal. We should have the discipline to add comments or write notes about other things we notice while programming and get back to them later.
Preserve Signatures: When breaking dependencies for test we should take extra care. We can preserve the signatures of methods. It allows us to copy/paste entier methods from place to place to minimize the chance of error.
For example if we have a method that we want to break dependencies we can extract part of the body, but we should make the signature match the parent method. It allows us to copy/paste the signature without change to minimize the chance of introducing errors.
Lean on the compiler: When we rename stuff or refactor things we can recompile the program and let the compiler tell us where we need to fix the dependencies. We should be careful though. Introducing subtle errors is easy. If a method is shadowing a method from a parent class, we do not get any errors.
Chapter 24, We Feel Overwhelmed. It Isn’t Going to Get Any Better
What is in it for you to work with legacy code? It is easy to think that it would be much better to work in a green-field system, but it just introduces other difficulties. Especially if the new system is going to replace an existing system eventually. Then we are in for many difficulties.
As we continue to push forward on the system and bringing parts of it under test we establish oases of good code that is a joy to work on.
Part 3, Dependency Breaking Techniques
The last chapter in the book is quite extensive, almost 100 pages. It contain a walkthrough of all the dependency breaking patterns used in the book. It is great for reference but it is a hard read.
Tags
Share

Legal Stuff