


Table Of Contents
The purpose of this article is to show why Test Driven Development is an excellent approach to software quality and how to use it. In the video demo, I show how to apply the principles by building an application in C#.
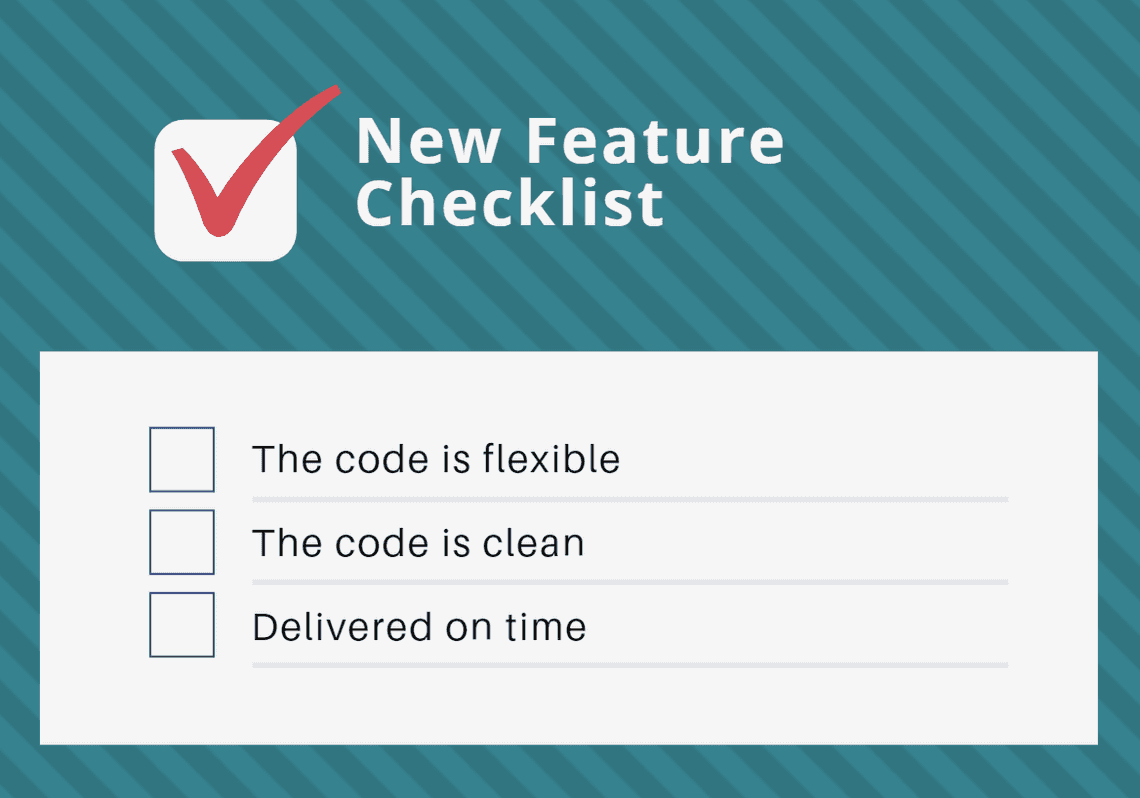
As professional software developers, we care about our code. We want code that is flexible, clean, and delivered on time!
That is the bare minimum we should strive for - yet we often fail to reach that bar. Instead, we end up with buggy and tangled code, delivered late.
Test-Driven Development(TDD) is a discipline that helps us get closer to the bar. It isn’t a silver bullet that fixes all issues we have with code. It doesn’t instantly transform us into professionals. But it gives us a structure to work with that makes it easier.
If you look in the literature, you can find discussions on the details of how and where to apply TDD. The consensus seems to be that testing is vital to create quality code and that TDD is an excellent way to approach it. It is the finer details in TDD that is being discussed.
What is TDD
TDD is a programming discipline “rediscovered” by Kent Bech in 2002 and described in his book Test-Driven Development by example. Because of its age, a lot of research has been done on the practice. It shows that TDD has a significant positive impact on software products’ quality.
TDD works by forcing us to write code in a controlled way. It is an iterative process with several steps that we iterate until we have implemented everything we need.
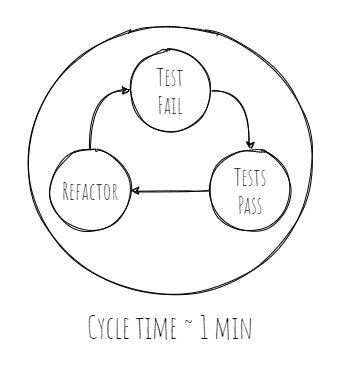
Notice that an iteration usually takes in the order of seconds to minutes. So the tests and production code we write each iteration is tiny. The process forces us to make tiny incremental changes to the code.
The TDD process
We shouldn’t see the process as dogma. The purpose isn’t to follow the process to the letter. Instead, it is a way to reduce the time from writing tests to production code to a few minutes.
That reduction makes it impossible for us to think,”I will get back to it later and clean it up” when we know that it isn’t going to happen. We always have our code in the best possible state.
TDD can’t stand alone. It provides us with a process that forces us to write code in a specific way. But it isn’t an excuse for not thinking. Other useful software practices like design patterns, DRY, SOLID, YAGNI, and others are still essential.
Don’t apply TDD mindlessly!
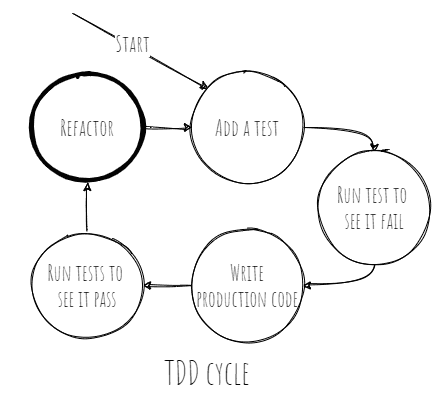
The TDD process goes like this
1. Add a test
We start by writing a test that defines a tiny requirement of the system. It is crucial to notice that we write the test before the production code. It forces us to focus on requirements first, which improves the code’s design.
A test that verifies the requirement that our system can calculate 40 from the string “5 * 8” could look like this:
using System;using Xunit;namespace UnitTests{public class MathEvaluatorTest{[Fact]public void Should_GivenFiveTimesEight_GiveForty(){var expression = "5 * 8";var sut = new MathEvaluator();Assert.Equal(40, sut.Evaluate(expression));}}}
2. Run all tests and see if the new test fails
To make sure that the test implementation is correct, we run it to see that it fails. The failure shows us two things.
- That the system doesn’t already have the feature, we seek to implement.
- We validate that we didn’t write the test in a way that causes it always to pass.
3. Write the code
Now we switch to the production code and write the code we need to make the test pass. The code doesn’t need to be perfect. It will be improved later. The new code must be the minimum required to have the test pass. That could mean returning a hardcoded value that we know will not be in the final design.
4. Run tests
To make sure that we didn’t introduce any errors, we rerun all tests. If anything fails, we keep changing the code until all tests pass again. This step increases our confidence in the changes we made.
5. Refactor code
From step 3, we might have implemented code that is difficult to follow, bad variable names, duplication, or other harmful code practices. In this step, we clean the code.
We continually run the test suite to make sure the refactoring doesn’t break anything.
Each iteration through this loop should not take more than a couple of minutes.
It is through this tight feedback loop that the magic happens - we end up trusting our code changes. The passing tests tell us that the change didn’t cause any errors. A lot of the magic happens in the refactor step, where we force ourselves to improve the code incrementally. It is the continuous refactoring that makes the mess we make manageable.
Test-Driven Development Demo
In this demo, I implement the Bowling game kata. The purpose is to write a program that can calculate the score for a bowling game — inspired by Robert C. Martin. It uses the classicist TDD approach.
Bowling rules

A game of bowling consists of 10 frames, as shown in the image above. In each frame, the player has two throws to knock down 10 pins. The frame’s score is the total number of pins knocked down, plus bonuses for strikes and spares.
The running score for the frames is the bottom row in the image.
The two throws are shown in the second row, the line with the X’s(strikes) and the /’s(spares)
A spare(shown as “/”) happens when the player knocks down all 10 pins in two throws.
The bonus for that frame is the number of pins knocked down by the next throw(in the next frame).
For example, in frame 3 above, the first throw hit 9 pins and the second throw hit the last pin, giving a spare.
The frame’s score is 10 (the total number knocked down) plus a bonus of 7 (the number of pins knocked down on the next throw, in frame 4.)
A strike(shown as “x”) happens when the player knocks down all 10 pins on his first throw.
The bonus for a frame with a strike is the value of the next two balls thrown.
In the tenth frame, a player who gets a spare or strike can throw the extra balls to complete it. However, no more than three throws in the tenth frame are allowed.
Building an application using TDD
In this demo I showcase how to apply TDD to build an algorithm that can score a bowling game using the rules above.
Why is trust in code essential?
We have all had the experience of opening a piece of code - looking at it and thinking. “That’s crap. I need to clean it.” and 2 seconds later, thinking, “I’m not touching that!” because you know that it will probably break, and if you break it, you own it!
It is a symptom of bad code. It slows us down because now we are implementing workarounds to avoid making changes to the original code.
When we are in this situation, the code will continue to deteriorate in quality. Eventually, it grinds development to a halt because nobody dares to change anything, and every new feature is a workaround. And often, we end up with even small changes breaking seemingly unrelated parts of the system.
The problem is that we are afraid of the code. The fear makes the code rot.
If bad code slows us down and we know it. Why do we write it in the first place? It is impossible to write clean and flexible code in the first iteration - we must first solve the problem, and it will be ugly. It will be ugly because we as humans don’t have the mental bandwidth to focus on solving the issue at hand and making the code clean.
We all know the thought when we have the ugly solution: “I will get back to refactoring it later.” But because of time pressure, we never get back, leaving it in a bad state.
The missing refactoring creates a vicious spiral that ends with all development eventually grinding to a halt.
TDD promises that refactoring becomes part of the process, so we never need to “get back” to clean the code. It is already clean after each iteration.
The benefits of TDD
Most of the time used while programming is spend reading. Having more readable code saves us much more time than we will ever use to write the tests in the first place.
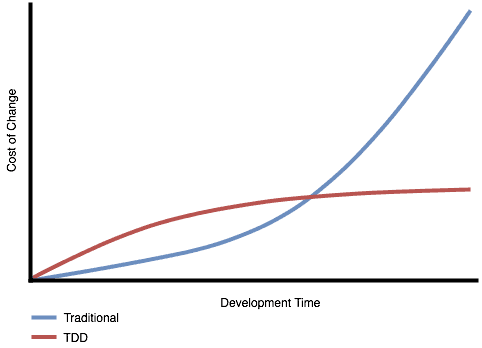
Experience tells us the story shown in the diagram here. If we don’t use TDD, over time, the cost of change will increase. Initially, we will be able to move fast. But since our confidence in the code deteriorates over time, eventually, the cost of change will start rising quickly.
With TDD, the initial cost of change is a bit higher. We need to carry the burden of writing the tests. But soon, that effort will pay off, and the cost of change will be almost flat.
It is the left part of the diagram before the lines cross that fools us. We think that the cross over will not happen for months, so it is not worth pursuing. But experience tells us that the cross over happens in days or weeks, not months or years.
TDD gives us a suite of tests that verify that our change didn’t break anything and that our change is implemented correctly. It gives us confidence in our change; the fear is gone. We dare to refactor the code. We gain control. We speed up.
While confidence and speed is the primary benefit, there are other nice things about TDD.
The code is testable: When writing production code in response to a failing test, it will per definition be testable. Testable code means decoupled code, which is an excellent practice to follow regardless.
The code is cleanable: Because of the confidence the test suite gives us, we dare to refactor the bad code when we find it—creating a good spiral where we keep improving the code.
The code works: According to research, up to 58% of production bugs are caused by trivial code errors. Errors that tests would easily catch
However, we also found
that for the most catastrophic failures, almost all of them
are caused by incorrect error handling, and 58% of them
are trivial mistakes or can be exposed by statement coverage testinghttps://www.usenix.org/system/files/conference/osdi14/osdi14-paper-yuan.pdf
The code is always known to be working: If a team is practicing TDD, you could pick any team member and know that the code worked just a minute ago. It increases the confidence of the team.
Code examples are created automatically: Tests are code examples for the whole system. It explains what each part of the system does and how it works. It is documentation - it can’t get out of sync. Any developer needing to use a class can read the tests to see all the use cases that the class is designed to handle.
TDD schools of thought
Even though the TDD process is rather strict, it doesn’t define everything. It leaves room for interpretation and has led to two schools of thought.
While both approaches used the same process of writing a test first, seeing it fail, then writing production code to make it pass, they differ on how we approach building the overall system. It leads to very different looking test cases.
The Chicago school is also called classicist or inside-out. As the inside-out name suggests, we build the system from the inside. Focusing on the bottom layers first.
The London school is also called the outside-in approach. As the outside-in name suggests, we build the system from the outside. Focusing on the top layers first.
Chicago school - classicist, inside-out
When building from the inside-out, we start with nothing. Building from the ground up makes it easy to control dependencies. Since we write the tests before the production code, we create testable code by definition.
Each Test will use the data-structures from the production code, and avoid depending on objects that are hard to instantiate.
A test case in this school usually follows the same structure, called state verification. It means that we initialize a state, execute a method, and verify the primary object’s state and its collaborators.
In this style, we don’t care what happens inside the system. We only care about setting up the initial state and what the end state is. We are testing the behavior of the system, not the implementation.
An example:
Suppose we have a method that evaluates string math expressions like “5 * 8”. In the classicist approach we could set up a test like:
using System;using Xunit;namespace UnitTests{public class MathEvaluatorTest{[Fact]public void Should_GivenFiveTimesEight_GiveForty(){var expression = "5 * 8";var sut = new MathEvaluator();Assert.Equal(40, sut.Evaluate(expression));}}}
We don’t have insight into the implementation inside MathEvaluator. It might delegate evaluation to an advanced parser subsystem, but that’s irrelevant as we are only concerned with the end state.
It might be that the initial implementation is all inside the MathEvaluator class, but at a later time, it is refactored and extracted to a subsystem, which we don’t know and care about. Depending only on the initial and final state allows us complete freedom to refactor the production code without changing the tests.
The classicist approach leads to code that is less coupled to the implementation and is testing behavior instead of implementation. Qualities that we want in our code.
Since we build from the ground up, there should be few cross dependencies to trip us up. The tests give a fine masked safety net that allows us to refactor the code with confidence. Since the tests are independent of the implementation, we should also not see many tests breaking when we refactor our code.
Each test we write is another specification that our production code should live up to. It drives the cycle that we make tests more specific, and the production code is forced to become more generic to pass the tests. This cycle gives a high cohesion, which gives low coupling that is the foundation for quality code.
The drawback of this approach is that we run the risk of creating code that is not needed. We need to anticipate the surrounding system’s needs, which can easily lead us to implement stuff that we don’t need.
Remember the “You aren’t going to need it” (YAGNI) principle.
Over-engineering is a risk to look outfor.
London school - outside-in
When building from the outside-in, we start with a use case. We need an entry point into the system that supports that use case. The test then defines the result we need. Since we don’t have the code on the lower layers, we need to insert mocks to act as stand-ins while building the rest of the system.
What is a mock?
A mock is a fake implementation of an object that we can control. Consider a method that uses a database object that talks to the database. In a test case that tests this method, we need to control the behavior of the database object. We can’t easily simulate a connection timeout or be sure that a key is no already used. Using the real object gives a lot of problems.
Instead, we replace the database object with a fake implementation where we can choose the behavior from the test case. It allows us to test behavior that is not easily accessible, and make sure the tests are more reliable.
One downside is that we must be 100% sure of the semantics of the real object. If we make our mock throw an ConnectionTimeOutException when the real object throws an IOExeception on timeout we have passing tests but failing production code.
An example of a london approach test case, consider a method in a controller:
using System;using Moq;using Xunit;namespace UnitTests{public class UserServiceTest{[Fact]public void Should_GivenValidCreateUserRequest_CallUserServiceWithMappedData(){var addUserRequest = new AddUserRequest{ Username = "foo", Email = "foo@bar.com"};var userService = new Mock<UserService>();var sut = new UserController(userService.Object);sut.AddUser(addUserRequest);userService.Verify(mock => mock.Create("foo", "foo@bar.com"), Times.Once);}}public class UserController{private UserService _userService;public UserController(UserService userService){_userService = userService;}public AddUserResponse AddUser(AddUserRequest addUserRequest){var created = _userService.Create(addUserRequest.Username, addUserRequest.Email);if(created){return AddUserResponse.OK();}else{return AddUserResponse.Fail();}}}}
If this is the first code we have in our system, we can’t test it since the “userService” object doesn’t exist. We need to pass a mock that we can control if we want to test this method’s behavior.
The benefit of it is that we focus on building only the parts needed to fulfill the requirements. The downside is that when using mocks, we tie the tests to the implementation.
This approach is sometimes referred to as the mockist approach because it uses mocks extensively.
A test could look like this.
using System;using Moq;using Xunit;namespace UnitTests{public class UserServiceTest{[Fact]public void Should_GivenValidCreateUserRequest_CallUserServiceWithMappedData(){var addUserRequest = new AddUserRequest{ Username = "foo", Email = "foo@bar.com"};var userService = new Mock<UserService>();var sut = new UserController(userService.Object);sut.AddUser(addUserRequest);userService.Verify(mock => mock.Create("foo", "foo@bar.com"), Times.Once);}}public class UserController{private UserService _userService;public UserController(UserService userService){_userService = userService;}public AddUserResponse AddUser(AddUserRequest addUserRequest){var created = _userService.Create(addUserRequest.Username, addUserRequest.Email);if(created){return AddUserResponse.OK();}else{return AddUserResponse.Fail();}}}}
In this example, we inject a mock to the controller to verify that the controller implemented the call to the user service correctly.
When using mocks, we bind the tests to the implementation. It forces us to change the tests if we change the implementation. It leads to fragile tests where small changes might cause us to change many tests.
The upside is that instead of focusing on the smallest parts of the system, we start with a use case and build from its entry points into the system. It forces us to think about how the application will be used and drives only the code needed to support those needs. It ensures that we don’t write dead-code and over-engineer our solution.
Which approach to choose
Both approaches can be used to drive our development. They focus on different aspects that are all important. The best answer is “it depends,” you are probably best off with a mixed approach.
When working on more algorithmic parts of the code, I would go with the classicist approach, but when writing code that is more integration heavy, I tend to use the London approach.
There are ways to always use, for example, the Chicago approach, but it is a tradeoff.
Tips to improve your tests failure messages
When a test breaks, can you easily understand why it broke? Often when a unit test breaks, you will end up scratching your head. How is that assertion ever going to be true? How could the author ever have come to that result? 3 tips to improve the situation
Use red
Usually, I see people move to implement the production code without even running the test. But that skips our opportunity to help our future self. Instead, we want to focus our attention on making the error message communicate why the test failed. Before moving forward
Gherkin syntax
Gherkin syntax originates from the behavior-driven development methodology. The purpose of the syntax is to describe behaviors, which is exactly what we need to communicate the intent of our tests. I use the syntax to name my tests so they will show up in my test runner. Making it easy to understand why the test is written in the first place.
Messages in asserts
If a test fails with the message that it expected false but was true, it communicates nothing. You will need to go back, read the code and understand it. Another way to communicate why a test fails is to add a descriptive message to the assert.
Transcription
I’m Frederik Banke and I teach programmers a better process.
If you’re looking for tips on how to write better code, you’ll love this video.
Keep watching!
In this video, I’m going to teach you three tips on how to make your failing unit tests much easier to understand.
Often when a unit test breaks, it’s not immediately obvious why it broke, in many cases, you’ll just end up standing there, scratching your head, not understanding why the test broke in the first place and how could it even have been passing.
So the question ends up being, is the test wrong and thus should be deleted, or is it actually alright?
But it’s my understanding of the test, that’s just totally off.
There are easy ways to improve the situation.
And the best part is that it’s going to require minimal effort to change a process.
When you’re doing TDD. One of the first things that you do is write a failing test, but how often I’m actually testing that your test fails before you start implementing the production code.
There are two reasons why I want to see your test fail and turn red before you start writing in your production code.
The first reason is that, that is how you test the test.
Since test cases, doesn’t have tests themselves, we need some other way to verify that they function as we are expecting them to function.
And the best way to do that is to run them and see that they turn red because that signals that the behavior that we’re testing is not yet implemented in our production code.
The second reason why we want to see the test fail is that by failing the test, we can see which message is actually displaying to us when the test fails.
And that allows us to evaluate how good or bad that message is and allows us to do something to improve it.
In many cases, I see people go directly to a writing production code. As soon as they see the test case, turn red without putting any attention to, if the communication of the error message from the failing test is actually useful.
Instead, we want to focus our attention on making sure that the error message communicates why the test failed and not just that it failed.
Before we move forward. In the following two tips, we’re going to look at how to do that in practice
Gherkin syntax originates from behavior-driven development. The purpose of the syntax is to describe behaviors, and behaviors is exactly what we need to have a structured approach to communicating the intent of our test.
Gherkin uses a few keywords like Given, When, Then, and they’re used to describe a behavior or a scenario.
When we write a sentence in this structure, it’s really difficult not to describe a behavior because a sentence becomes really strange otherwise.
So that structure helps us communicate our intent in a better way. I use the Syntex when I write the names of my tests and I do that, because then the actual sentence will show up in my test runner.
So when a test fails, just reading the name of the test will explain to me why the test was written in the first place, without me actually having to understand the content of the test.
If a test fails with the message that it was expecting false, but something was true that communicates nothing.
You need to go back, read the code and understand it to understand why something was actually not false when it was supposed to be false.
Another way to communicate why an assertion failed is to add a descriptive message.
The more descriptive we can make the message, the easier it will be for our future self to understand why this failure happened.
Adding messages to assertions is a surprisingly controversial subject. I use xUnit as my testing framework, and they have chosen not to have messages available in all their assertions.
And that’s by design. The reason for doing this is that they prefer clear code over comments.
So they see a message as a comment, and they would rather have people focusing on making the intent of the test, more clear through the actual code in the test.
I get the argument why we want to have clear code instead of focusing on comments.
But I still prefer that, I have the ability to add a message because the message will allow me to communicate something that is not easily read as part of the code.
So since xUnit doesn’t provide me with the ability to add messages to all my assertions. I use a fluent assertion instead because they do have the support.
To sum up, improving failure messages can be done in a lot of ways.
The key point here is that the better we can make the failure message communicate why the failure happened.
The easier we will have when we see the test fail in the future. Just by putting a bit more effort into the red state of TDD, you will find ways to improve how your tests communicate failure.
No matter if it’s Gherkin syntax or by having better than messages.
Okay, that’s it for tips on how to improve the failure messages of your unit tests.
I hope this video will allow you to create better tests in the future. If you learn something new from this video, make sure you follow me on LinkedIn for more tips on how to improve your coding process.
Now it’s your turn.
Which tips are you going to implement in your own code?
Is that just putting more focus on the red part of TDD or maybe use a Gherkin syntax.
Leave a comment below!
Why Prioritize Tests?
Tests need to be prioritized but maybe not for the apparent reason.
In many teams, tests are implemented because they have to, not because of the benefits they bring.
Most developers I talk to know that having tests are a way to increase the quality of the code. At least in the long run.
The problem with untested code is about productivity. We will become fearful if we don’t have a safety net to guide us when we refactor our code.
When we are fearful, we are worse at deciding to refactor. Instead, workarounds seem less risky. But each workaround piles additional accidental complexity to the system.
Eventually, the productivity grinds to a halt as everything I a considerable mess.
Using tests is a way to break the death spiral. We get the confidence to do refactorings when needed.
The statements above are not controversial. I find that most developers agree with them. We often disagree on the part when the benefit of having good tests gives higher productivity than not having them.
The gut feeling tells most people that we can keep productivity higher far into the future, but usually, the impact is hit as soon as a few sprints into a project.
Do you see the same fast return on investment for tests?
Transcription
Many of the software developers I talked to, are not actively using tests in the projects.
In many cases, if they even have tests, the quality is low, or the test is really shallow and not really testing the functionality, it should be testing.
When we take the discussion a bit further, most people are aware that tests are a good thing.
That test will help actually facilitate Refactoring and help them maintain the quality of the product in the long run.
The, the difficulty is usually not whether or not tests are a good idea when we talk about quality, but usually more on, will it actually help me, now or will the shortcuts that I take by not having tests hit me in the future.
And usually that future is deemed to be so far away that it’s not relevant to, to spend time on tests.
So why is it that a TDD or test in general is a good investment?
So if we look at the, at the diagram and we have at the, the vertical axis, we have cost of change.
And on the other axis, we have time. So if we look at a, a standard software project that are not using tests, then we’ll start off with a blank screen.
And our cost of change will be pretty low. It will, have a more or less a flat line. So we are able to implement changes real cheap.
The problem is that as we, as we have a larger and larger coat base, we will start to get fearful, because we don’t have tests courage, to signal that the changes we make, are okay, and are not breaking anything.
So, so we start, doing work around on different parts of the code because work around seeing lower risks than changing the actual code, but that creates a death spiral where we continue to make the code more difficult to change and causing us to, to slow down.
So what will happen, is that the cost of change will start increasing.
So we get a curve that looks kind of like this.
And eventually the, the amount of, of the cost of doing a change will become prohibitively high and actually cost of project to 2 gradual holes.
If we compare that to running a project in TDD way, we start at the, at the same place. And now we also have to increase the cost of doing tests together with actually implementing the feature.
So initially the curve would be steeper.
So it, it, it is more expensive implement TDD in the star, but now comes the big difference.
And that is, when we do CDD, we have a test harness to signal that whatever changes we are doing are not actually breaking anything.
So instead of crossing the cost of change to rise, the, the cost of change will kind of flattened instead, have a curve that looks more like this.
The system is still becoming more and more complex over time as it grows, but we are able to control the complexity in a better way.
So we don’t have the same explosion in cost of change as if we didn’t have the test cases.
So, so we have a more flattened curve. Usually when I talk to people, they don’t disagree with this outlook.
What we usually disagree with is when is this cutoff point?
When is it that, building a system using tests are cheaper than building a system without tests?
And what I usually hear is that that’s the far future it’s it’s years away before we hit this point.
But in my experience, it’s actually much sooner.
It’s usually within a few weeks. So if you’re running scrum,
I would say a one to two sprints.
By that time, you will have a, a cost of change where you will start seeing the benefit.
So it’s actually that soon.
Bootstrapping TDD
Transcription
When we start a new project, we just look at totally blank screen and we want to use TDD,but how are we supposed to start with that?
What are the prerequisites to enable us to do TDD? And what is the first test that we’re actually going to write?
So one concept that I think is really helpful is the concept of a walking skeleton.
We want to implement just enough code that we can actually have end-to-end functionality in our system, and we’re going to build that using TDD and the TDD process.
But we cannot just, kind of, just start writing tests from nothing.
We need to have some idea where we’re going.
So even though TDD prescribes that we really don’t need architecture upfront, we still need some kind of idea about where we’re going.
In some cases if the system is simple, or it’s something that you have done a lot of time, you will kind of have it in the back of your head that you know where you are, where you’re going, so you don’t really need a drawing of it.
But in some cases where it’s new territory, or it’s a domain that you are not used to, I think we can benefit from having a little bit of design up front to understand what the, kind of the boundaries of our system is going to be.
Another benefit of having this idea from the beginning is that by implementing end-to-end, and having it kind of pressure tested by TDD, is that now we are also really testing that the idea is also sound, that the architecture we are doing is reasonable because the absolute best way to test an idea out is if we automated, because automation requires us to have a much deeper understanding that we would have otherwise, if we were just to do manual testing, for example.
So by having the automation process as well, we really test that everything is as it’s supposed to be. So to set up the TDD project, the initial step, we need to understand the problem.
We need to have some brainstorming where we actually understand the problem.
Maybe not the complete problem of the full domain, but we need to have some idea about, at least, part of the problem domain, because that will lead to some kind of architectural system.
We have some way of structuring the thoughts that we were having.
It’s not going to be full-fledged architecture.
It’s just going to be some idea about how are we going to do this.
So it’s going to be something broad brush.
Broad brush design.
When we have that, we want to start our automation part.
So when we automate, we want to make sure that our build process is automated.
We want to make sure that our deployment of the build is automated.
We want to make sure that the end-to-end test is automated.
We don’t necessarily want a full-fledged like Selenium test suite or anything like that, but we need to have some kind of verification that when we actually have deployed our system, then it is actually running as well.
So when we have all of that automated, we have a very thin slice of our system already in place.
We have what’s called a walking skeleton and that is what allows us to start our TDD process.
Where we have the start by writing a test, make it pass and refactor.
So it’s only when we actually have some level of existing functionality that we can hope to apply TDD.
It’s not something that you can start with right off the bat.
Testing through public interfaces
Tests that depend on implementation tend to break when the implementation change. They break for exactly that reason. You should strive not to have your tests care about the implementation details.
You do that by testing through the public interfaces in your code and not testing the details behind it.
One way to achieve that is only to have the classes meant to be public, public. The rest should be internal.
By having them internal, the tests can’t access them, forcing you to test through the public interfaces.
The concept is called sociable tests
Transcription
I want to take a few minutes to talk about test driven development and why it is that we see an explosion in the amount of test code.
A lot of the projects I’m looking at, I see two to three times as much test code as actual production code.
And there’s something that seems quite odd with the difference. The amount of test code shouldn’t be that large.
One of the reasons is that in many cases, there is a tendency to have a focus on the implementation details.
So instead of just looking at the public interfaces of the classes that we’re supposed to test, we’ll test each individual class that’s a part of the implementation details and not really part of the public interface.
And that makes the test brittle. So whenever something in the implementation details changes, now the test will break even if actually preserved the behavior of the test.
And so that’s one downside of it that because we write tests in this way, they will be much more prone to fail.
The other issue is that if we take the approach that every time we spin up a new class, every time we create a new class, it’s essentially a public interface and then we’ll create test suite for it.
And that’s not really helpful because a lot of the classes that are sitting below a public interface are really implementation specific details.
So it depends on how the developer actually wanted to realize the functionality and expose that through the public interface.
So he changes his mind and he wants to change how the implementation is done, the test shouldn’t break, but usually they do.
And that’s the problem.
But let’s look at some drawings here.
So I’ll explain a bit more what I actually mean.
It’s usually easier to see.
Let me try to illustrate what I mean when I said that we are having too many implementation details as part of our code.
So if you want to run through the standard TDD process, you’ll start off by writing some test case.
And that test case will test some code. That’s how we usually do it.
And then we go to the refactoring step and it could be we look at the code inside this class, and we see that we will benefit from spinning that off into a new class.
We’ll create ourselves a new class containing some of that functionality.
Now this class is dependent on this class, but if we want to test this thing in isolation, we need to have this part under control.
And that’s usually by mocking it. So we’ll end up having our test case and then we’ll implement a mock of this class.
And then we’ll be able to, using this one test our class.
And that means that now we have incurred some information about this class, which is the implementation details for this one, inside our test case, we are actually setting this one up and that’s kind of the problem because now we have additional code to control this part and we have the edit complexity.
And if for some reason we want to change both how this class works and how it operates from this class, then our test breaks.
Even if we are actually preserving the behavior of the test it’s still going to be broken.
And then we have to refactor all of our test cases because now they’re broken.
Another way to think about this is to use a concept called sociable test.
So instead of seeing the original class as the unit of isolation, we can see the public interfaces, the unit of isolation.
So if we write again, a test case and we are implementing our class to make our test pass, and again if our refactoring step makes us spin off a new class, then this class, the new one that we’re depending on that will be internal.
And an internal class is not something that we’re publicly exposing.
It is something that’s part of how we are implementing the functionality of our first class.
So now the isolation unit will be this one since it’s internal and usually our test cases are residing in a different project, the test cases will actually not be able to access this class.
So the only way that it can test is through the public interface of our class.
And that makes the test case simpler. And we have fewer of them because now we don’t have a full test suite for all of our internal classes.
So that improves both the complexity and the amount of code that we have in our test cases.
Summary
TDD is a process that allows us to reach a higher bar for our code. As professional software developers, we care about our code. We want code that is flexible, clean, and delivered on time!
My recommendation for getting started is to do a code kata a couple of times using the process. It allows you to feel the process and is good preparation for using it in an existing codebase.
Share

Related Posts
Legal Stuff