


Table Of Contents
This part ended up being a lot more involved and much longer than I expected. In this part my goal was to make the production deployment process smoother, make it easier to do development on the setup and prepare it to be more redundant.
Before I started, the production deploy process was to connect my IDE(phpstorm), with it’s docker-compose integration, to my remote docker and run a “docker-compose up”. This workflow has some drawbacks
- It is easy to deploy to production by error since it is only a single click in the wrong place - so I can’t be sure that the running version maps to a specific revision in my git
- When I deploy, the containers are taken down until the new containers are booted, causing service disruption
- There are no easy way to do a revert, if I deploy a setup with errors, it is a manual process to revert it to a previous version
- I would like to work with Continuous Integration / Continuous Deployment (CI/CD) as a pipeline for a more smooth workflow which requires a more tight control of the process
- I don’t have an easy way control differences between development and production
- Also I would like to prepare to work with replicated services where the service would have a fall over if an error crashes a container.
Much of this part are to prepare the setup to solve the challenges above. I did not manage to solve all of the problems up front, which disappointed me a bit, but it will be solved in later parts.
What we will cover in this part
I use bitbucket.org as my git provider. They have a build pipeline concept in their system. I use this to leverage the build and deployment process, so I will cover how this is configured.
Then I need a deployment system to build on top of docker-compose to manage the actual containers, monitor that they are running, make sure they don’t use to many resources and to support replication later. There are many different solutions for this, Amazon has their Elastic Container Service(ECS), there are kubernetes, ansible and docker has their own system called swarm.
I ended up selecting swarm because it is part of docker already, I hope this makes the learning curve less steep or at least makes the systems integrate better. My current understanding are that it is actually swarm that is the backend for amazons docker system, at least they use many of the same terms. So hopefully this will give me the option for a smoother transition later if needed. In a fancy word the tools are called orchestration tools.
Swarm or any of the other orchestration tools needs a place to pull the actual docker images. Docker hub is the default official place where docker images are located. When you signup you get to have a single private docker repository for free. But in my setup I have five different images, this requires me to have a payed account, which I don’t want for a hobby project. Instead I looked into two other options, either boot an Amazon EC2 instance and host my own repository, or use the repository system provided by Amazon. I ended up selected the last option.
Lastly I will give some thoughts to how I make the development process smoother, while still maintaining the ease of deploying to production.
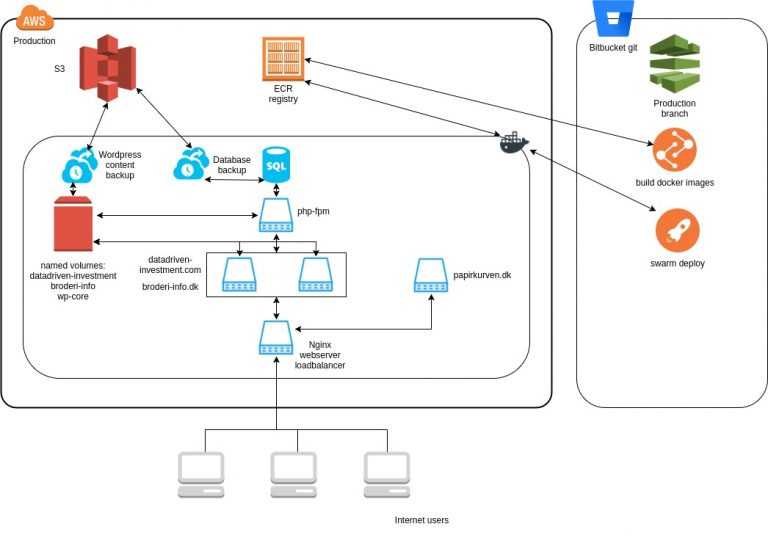
Infrastructure diagram, now we have the same services inside the AWS cloud, but now I’m not directly communicating with docker, that is handled from the pipeline inside bitbucket. So now everything will get deployed without any human intervention.
You can download the full project here.
Transition from docker-compose to docker swarm
I was happy to see that swarm use the same docker-compose.yml file that I already setup for docker-compose. I only needed to change from version 2 of the file format to version 3. The largest difference is that, docker-compose use the “build” to point to Dockerfiles that it uses to build the images, where swarm needs pre-build images, it can’t build the images automatically. So as mentioned above I need a docker repository for the images.
I updated the docker-compose.yml to the following setup, preview below. The only change is the image part on all services. Then when running the old “docker-compose up” it will build the images making development easy. But when deploying to swarm it will fetch the images from my amazon docker registry. Making deployment easy as well.
http1:image: 637345297332.dkr.ecr.eu-west-1.amazonaws.com/patch-httpd:latestbuild: httpdlinks:- phpvolumes:- wp-core:/var/www/datadriven-investment.com/:ro- wp-core:/var/www/broderi-info.dk/:ro- datadriven-investment-data:/var/www/datadriven-investment.com/wp-content:ro- broderi-info-data:/var/www/broderi-info.dk/wp-content:ro
On swarm mode every service is monitored and if the container crashes it will be restarted. One of the services, the “fileserver” is used to populate the named volumes when booted, we have no need for swarm to keep restarting this service. This requirement is changed using a restart policy
fileserver:image: 637345297332.dkr.ecr.eu-west-1.amazonaws.com/patch-fileserver:latestbuild: fileserverdeploy:restart_policy:condition: nonevolumes:- wp-core:/var/wordpress/
Easier development
With this setup I can keep using my local docker-compose integration in my IDE while developing. But use docker swarm for production.
I did two more upgrades to make development easier. 1. I added broderi-info.local and datadriven-investment.local and made them resolve to 127.0.0.1. Before I did this change I needed to change my hosts file to point broderi-info.dk at 127.0.0.1 to get the browser to request each of the websites. Really annoying.
2. The wp-content folder is a named volume in the setup. This means that it is managed by docker, I can of course use the containers to copy files into this folder. But when doing development it is less than optimal.
Because of this I changed my development setup to use a normal volume inside my development project to host the files. This can be handled by the override function of docker-compose. I created an extra docker-compose.development.yml that allows me to override the mount point for the wp-content folder. It looks like this.
version: "3"services:php:volumes:- './development/datadriven-investment/:/var/www/datadriven-investment.com/wp-content'
I’m now able to run the command “docker-compose -f docker-compose.yml -f docker-compose.development.yml up” and now the wp-content folder is mounted from my development environment.
I then just need to manually transfer the database from the production environment and do a copy of the production wp-content to have a 100% decoupled development environment with the same setup.
I might change this to updated automatically if the need shows up.
Setting up a docker registry at AWS (ECR)
This part took me some time to wrap my head around, it ended up being quite easy in the end. It is a 3 step process
- Setup a user for IAM, as described in this guide
- Login to the IAM console using this new user
- Create the repositories
Remember to select the correct region since the registry is bound by region and it caused me a few hours of head scratching.
Now we have a setup like this
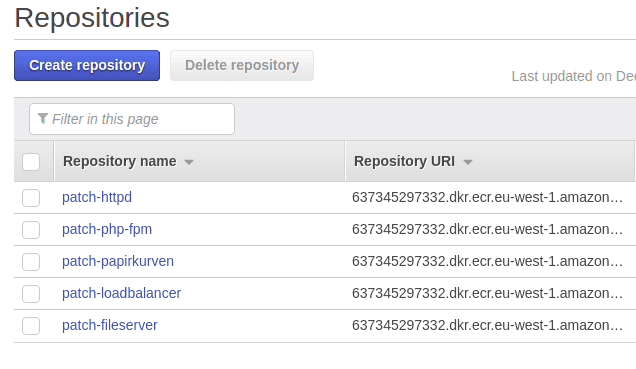
With a repository for each of the images we need. Then we need the key information from the IAM user to add to bitbucket so the pipeline can push the build images to the registry, explained later. One potential pitfall of using a repository is that every build will cause a new image to be saved in the ECR. The images vary quite a bit in size, from 7MB for the patch-httpd images to 86mb for the patch-papirkurven image. This can grow in size quite fast depending on the amount of builds.
To do maintenance of images amazon provides lifecycle policies. I have setup a policy for each of the repositories to only keep the latest 5 images. Since this will only contain production images I will only use it to do rollback to a previous version. Most likely the version just before the latest one.
My policy setup looks like this, for each repository:
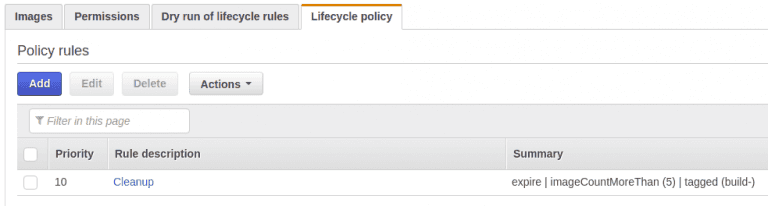
In this case my repository will not grow larger than 5x images size, which in my case are: (12+43+86+31+7) * 5 = 895 MB in total. It does not seem like ECR has the possibility to share policies across repositories, so I just created them 5 time exactly the same.
Docker swarm
The concept of swarm is to run multiple docker nodes across multiple machines, on the nodes the services are deployed. Swarm then makes sure that if any node and/or service crashes it will restart them to make sure the setup is always running. Running swarm across multiple nodes is something I consider for the future. Right now I just run docker on a single node, this seems to make management much easier currently.
Setting up a swarm is quite easy. Since docker is already running on the machine I only needed to run the following command to create a swarm
docker swarm init
Since I only run a swarm on a single node I don’t need to handle anything else. When deploying my services I just run the command:
docker stack deploy —compose-file docker-compose.yml papirkurven —with-registry-auth
This creates a stack that is called “papirkurven” which will boot services based on the setup in the docker-compose.yml file.
I did run into a few problems. If the swarm is redeployed “to fast” it will not delete the virtual network that is created. This causes the deployment to fail. I needed to “rm” the network manually.
Setting up an automatic build pipeline at bitbucket
To make all the cogs turn together the build pipeline inside bitbucket is used. The build pipeline is specifically made for CI / CD purposes. It is quite easy to setup, and it uses a .yml file that is part of the git repository to maintain the configuration. This makes it very easy to maintain.
The first step I needed the build pipeline to do are to build the docker images and push them to my amazon registry. As mentioned above. This was easy to setup, thanks to Thomas Strohmeier who wrote a guide. I struggled a bit with having an outdated awscli on my host machine, but after i updated it, no problem. So make sure to keep you host machine up to date.
The second step are to deploy the images in the swarm, this caused some issues. When deploying the images the host node needs to be able to fetch the images from the amazon registry. But to do that it needs to login because each login generated by amazon expires after 24 hours. The command to login is a bit strange: an aws command outputs the actual docker login command that then needs to be executed. I ended up created a simple deploy.sh script to run the commands.
But first the actual pipeline setup
options:docker: truepipelines:branches:Production:- step:#python image with aws-cli installedimage: tstrohmeier/awscli:3.6.3script:# aws login- eval $(aws ecr get-login --region ${AWS_DEFAULT_REGION} --no-include-email | sed 's|https://||')# docker- export BUILD_ID=$BITBUCKET_BRANCH_$BITBUCKET_COMMIT_$BITBUCKET_BUILD_NUMBER# loadbalancer- docker build -t ${AWS_REGISTRY_URL}/patch-loadbalancer:build-$BUILD_ID loadbalancer- docker push ${AWS_REGISTRY_URL}/patch-loadbalancer:build-$BUILD_ID- docker tag ${AWS_REGISTRY_URL}/patch-loadbalancer:build-$BUILD_ID ${AWS_REGISTRY_URL}/patch-loadbalancer:latest- docker push ${AWS_REGISTRY_URL}/patch-loadbalancer:latest# httpd- docker build -t ${AWS_REGISTRY_URL}/patch-httpd:build-$BUILD_ID httpd- docker push ${AWS_REGISTRY_URL}/patch-httpd:build-$BUILD_ID- docker tag ${AWS_REGISTRY_URL}/patch-httpd:build-$BUILD_ID ${AWS_REGISTRY_URL}/patch-httpd:latest- docker push ${AWS_REGISTRY_URL}/patch-httpd:latest# fileserver- docker build -t ${AWS_REGISTRY_URL}/patch-fileserver:build-$BUILD_ID fileserver- docker push ${AWS_REGISTRY_URL}/patch-fileserver:build-$BUILD_ID- docker tag ${AWS_REGISTRY_URL}/patch-fileserver:build-$BUILD_ID ${AWS_REGISTRY_URL}/patch-fileserver:latest- docker push ${AWS_REGISTRY_URL}/patch-fileserver:latest# papirkurven- docker build -t ${AWS_REGISTRY_URL}/patch-papirkurven:build-$BUILD_ID papirkurven- docker push ${AWS_REGISTRY_URL}/patch-papirkurven:build-$BUILD_ID- docker tag ${AWS_REGISTRY_URL}/patch-papirkurven:build-$BUILD_ID ${AWS_REGISTRY_URL}/patch-papirkurven:latest- docker push ${AWS_REGISTRY_URL}/patch-papirkurven:latest# php-fpm- docker build -t ${AWS_REGISTRY_URL}/patch-php-fpm:build-$BUILD_ID php-fpm- docker push ${AWS_REGISTRY_URL}/patch-php-fpm:build-$BUILD_ID- docker tag ${AWS_REGISTRY_URL}/patch-php-fpm:build-$BUILD_ID ${AWS_REGISTRY_URL}/patch-php-fpm:latest- docker push ${AWS_REGISTRY_URL}/patch-php-fpm:latest- step:image: node:4.6.0script:- ssh ubuntu@papirkurven.dk "git archive --remote=ssh://git@bitbucket.org/fbanke/patch.git Production deploy.sh --output deploy.sh.tar"- ssh ubuntu@papirkurven.dk "tar xf deploy.sh.tar"- ssh ubuntu@papirkurven.dk "bash deploy.sh"
The first step are more or less copy / paste from the guide mentioned above. I did change the tag from just the build id to be prefixed by build-, so i have tags like “build-7”, “build-8” aso. This is to make the ECR policies be able to match the tags. Because it works with prefixes.
The next step could possibly be a bit more clean, but it fetches the deploy.sh script from the Production branch and runs it. It looks like this:
# login to aws docker repositoryeval $(/home/ubuntu/.local/bin/aws ecr get-login --region eu-west-1 --no-include-email | sed 's|https://||');# fetch the docker compose file to start deploymentgit archive --remote=ssh://git@bitbucket.org/fbanke/patch.git Production docker-compose.yml --output docker-compose.yml.tar;tar xf docker-compose.yml.tar;# deploy!docker stack deploy --compose-file docker-compose.yml patch --with-registry-auth;
For the docker stack deploy command to be able to fetch the images from my private repository it needs to be logged in. This is handled by the first command.
Then I fetch the docker-compose.yml file from git, and lastly it is deployed into docker.
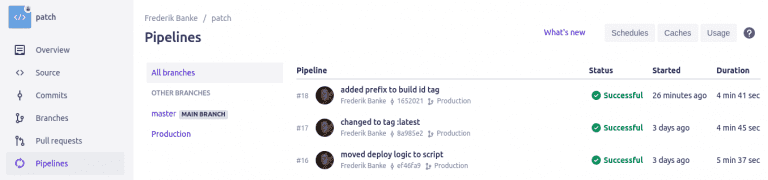
The pipeline interface looks like this.
And the actual build
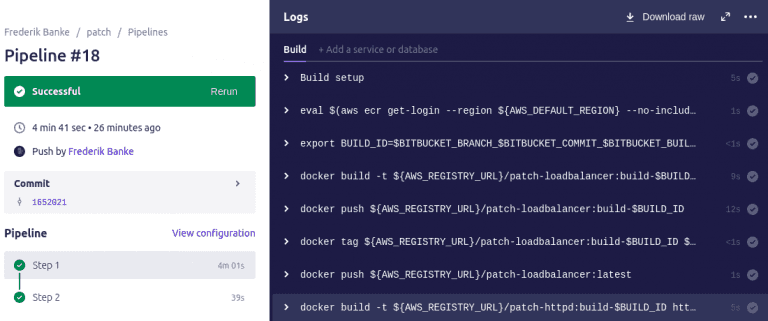
For free bitbucket gives 50 build minutes - a full build for me, takes around 4-5 min, so I can do around 10 deployments each month, this should be fine for me.
Most of the time are consumed in building the php-fpm image because it needs to compile the php modules each time. I do think that there must be a better way to do this since I don’t use any special modules.
Next steps
Since the most limited resource right in my setup right now is the build minutes in the pipeline I would like to improve that. Most of the time are spend compiling php modules, which does not change at all, so I don’t see the point of this.
The http servers are setup as http1 and http2, this is redundant setup and will also not scale. So I need a way to combine them to be scaleable by swarm instead.
Share

Related Posts
Legal Stuff